All About BULBS...
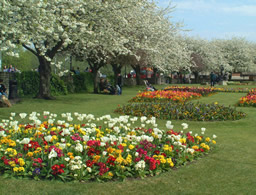
All fall and winter long, while skies are gray and the ground is cold and quiescent, newly planted bulbs can be setting the stage for a colorful extravaganza in your garden the following spring. Select different varieties that bloom from early spring to early summer and these flowers will light up your landscape until perennials and summer annuals come into their full glory later on.
When I say “bulbs,” I’m including corms, tubers, and rhizomes, which are other swollen storage pieces located below ground. They are grown primarily the same way as bulbs.
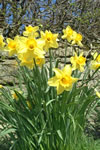
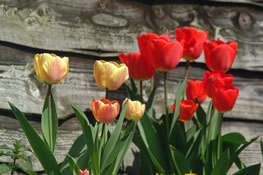
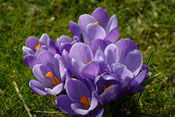
Fall is a perfect time to plant spring-flowering bulbs such as tulips, crocuses, daffodils, and hyacinths. Put them in the ground whenever the soil temperature has cooled down to 60°F. The bulbs will get their required chilling period -- which is necessary to induce blooming -- and root systems will become established during the fall and winter months.
Summer and fall blooming bulbs such as dahlias, gladiolus, crocosmia, lilies, tuberous begonias, and agapanthus may be planted in spring.
Gardening centers and catalogs offer good sales on bulbs for fall planting. They are undeniably a better bargain now than they were in 17th century Europe. During the tulip boom known as “Tulipmania,” Dutch bulb traders earned today's equivalent of double-digit incomes each month, according to the Netherlands FlowerBulb Information Center. Records from that time show that a single tulip bulb once went for two loads of wheat, four loads of rye, four fat oxen, eight fat pigs, twelve sheep, two barrels of butter, 1,000 pounds of cheese, two hogsheads of wine, four barrels of beer, a silver beaker, one bed, and a suit of clothes.
BUYING BULBS
When buying bulbs at your local retailer, select those that are firm and free of deep blemishes, cuts, or soft spots -- although loose skins are okay. Bulbs should feel heavy for their size, not light and dried up. Larger bulbs are older and produce bigger blooms the first year, but small bulbs catch up quickly.
If you are unable to plant your new bulbs right away, store them in a cool, dry place where the temperature is around 40°F. A refrigerator works great. Avoid moisture build-up by keeping bulbs in mesh or paper bags until you plant them.
WHERE TO PLANT BULBS
Pay good attention to site selection. Whether you plant bulbs in formal groupings or in a naturalized design with bulbs scattered around, most bulbs need full sun to produce good blooms. This means at least five to six hours of direct sunlight each day. Bulbs left in the ground from year to year do best with even more sunlight.
Many bulbs do OK in partial shade, but blooming might be delayed. Take advantage of that trait by planting some in sun and some in partial shade to extend the bloom season.
PLANTING BULBS
 Good soil drainage is crucial because bulbs tend to rot in wet soil.
Dig individual holes for scattered bulbs, and prepare larger beds for
mass plantings. Spade the soil eight to twelve inches deep and improve
drainage if necessary by adding organic matter.
Good soil drainage is crucial because bulbs tend to rot in wet soil.
Dig individual holes for scattered bulbs, and prepare larger beds for
mass plantings. Spade the soil eight to twelve inches deep and improve
drainage if necessary by adding organic matter.
Bulbs need a good source of phosphorus for strong, healthy development, so at planting time use a bulb fertilizer that is high in phosphorus and low in nitrogen. Wait until spring when green growth begins poking out of the earth before applying nitrogen. Bulbs benefit then from a foliar feeding.
A good rule of thumb is to bury bulbs to a depth that is two and a half or three times their diameter. Use a trowel or a round bulb planter, whichever is easiest for you. Plant them with pointed ends up and roots, if you see any, facing down. Firm soil around the bulbs and water thoroughly. Keep the soil from completely drying out during extended dry weather.
Space larger bulbs six to eight inches apart, smaller ones two to four inches apart. Larger plants such as Giant Allium and Crown Imperial Fritillaria need a good ten to twelve inches.
Joyce Schillengardenpg@cdsnet.net
http://www.gardenpages.com
CARING FOR BULBS
Bulbs are easy to grow once they are planted. After growth begins in spring, water bulbs during dry weather until blooming is completed. Then taper off to allow plants to go dormant.
After the blooms have faded, deadhead flowers so the plants will not put their energy into making seeds. Seed production uses up food that bulbs need for winter survival and future growth. Foliage will begin to turn brown, but let it stay in place until it is completely dead. The leaves, while green, are manufacturing food that is stored in the bulb for later use. I don’t recommend braiding fading foliage to tidy up the garden, because the lack of air circulation encourages fungal growth.
If tulips or other bulbs become too crowded, lift them, divide, and replant. Otherwise, just leave them in the ground to bloom brilliantly year after year.
GOPHERS & RODENTS
Gophers will greatly appreciate your bulb planting efforts. They are special fans of tulips, which they see as being tantamount to Thanksgiving dinner. Gophers have pretty much ignored the other bulbs in my garden, except for the one year they rearranged some daffodils I had carefully, although inadvertently, planted along one of their runs next to a fence. Recognizing poisonous plants when they come across them, the gophers didn’t eat those daffodils, they just shuffled them around. Gophers apparently have unique ideas about daffodil design. Flowers popped up in odd and unexpected places the following spring -- in the middle of an asparagus bed, and in the shallow soil on top of the septic tank.
One sure and easy way to thwart gophers, mice, and other rodents if they are a problem in your garden is to cage them out. Place a bowl of chicken wire or hardware cloth in the bottom of planting holes to protect the bulbs. Place another cage on top to foil squirrels.